![]()
Infinite zoom
![]()
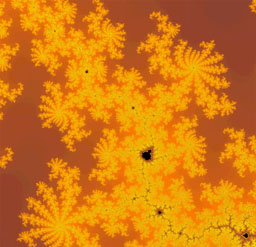
This effect is supposed to give you the impression you're zooming into an infinitely detailed picture. While zooming in, the picture doesn't blur. Instead it constantly reveals new detail. Perfect candidates to generate pictures of that kind are fractals. Since it is still not possible to render fractal zooms at interactive frame rates - especially when zooming deep into a fractal - we use a trick to achieve the desired effect. Instead of recalculating the image for every position on the path into the fractal, we pre-calculate a sequence of textures for a fixed number of key frames on the zoom path, one texture for each key frame. When drawing these textures to the screen in a proper way one gets the illusion of an infinite zoom. To maintain this illusion there are three rules that should hold true for each texture in the sequence:
-
Each texture should cover one quarter of the previous texture, to gain enough new detail for the area of interest - the area we're zooming into.
-
The corresponding bounding square of each texture has to reside strictly within the bounding square of the previous texture. That has some limitation on how the zoom path can be chosen.
-
The texture resolution should at least match the screen resolution. Otherwise while zooming into the fractal the rendered images will be quite blurry in the corners of the screen.
In Meshuggah the mandelbrot set was used to generate a sequence of textures obliging these rules. Each texture has a corresponding bounding square (that is, a set of four gaussian coordinates z = a + bi) defining the area of the fractal the texture belongs to. To render an image of the fractal zoom each bounding square will be used to form a quad that gets placed on the x/y plane by simply transforming the four gaussian coordinates into four 3D cartesian coordinates in the following way: z = a + bi → v = (a, b, 0). The quads will be rendered using their corresponding texture according to their position in the sequence, each overdrawing parts of previous ones. The camera is set up in a way that it is hovering over the x/y plane looking straight down using a field of view (fov) angle of 90 degrees. Its position is determined by evaluating a simple Catmull-Rom spline - other kinds of splines work as well - based on the key frames of our zoom path for a given time t. Each key frame stores a 3D vector (x, y, z). x and y are the coordinates of the center of the bounding square for each texture. z is half of the width (or height respectively) of the bounding square. (x, y, z) is chosen this way because for a given quad j, place the camera at (xj, yj, zj) and set it up the way it was described earlier. When you render quad j, it will cover the entire screen (if the screen aspect ratio - that is, screen width by screen height - is one). That's the reason why the texture resolution should at least match the screen resolution because at this point we want to have at least one texel available in the texture for each pixel on the screen. Otherwise the result will be blurry.
Using high resolution textures can be quite problematic as they consume lots of memory and bandwidth resources. For the infinite zoom in Meshuggah mip-mapped 1024 pixel × 1024 pixel textures were used. Each one alone would take up six megabyte as a raw 32 bit color texture. That's definitely way too much. Especially when considering the fact that the zoom path in Meshuggah consists of ten key points, hence ten textures wasting 60 Mb of texture memory. That memory should be used more wisely for other effects and to avoid texture swapping during demo replay. Fortunately there is way out of the dilemma without compromising the depth of the zoom. By using compressed textures (DXT1 in our case) we are able to cut down the storage space for each texture to one eighth of its original. All this is obviously not totally for free. Saving the texture in a compressed format will introduce artifacts that will be visible depending on the texture content. Also, colors in compressed texture formats are usually stored at a lower color depth (16 bit for the colors at either extreme of a compression block in DXT1), thus introducing color bleeding. In order to remedy this and improve texture quality it is advisable to turn on dithering when saving textures in a compressed format.
There's not much to say about the shaders really. The vertex shader simply transforms each quad to its proper position on the screen and feeds the pixel shader with texture coordinates. The pixel shader in turn fetches a color from a texture map for each pixel of the quad on the screen and uses it as the output color.
![]()
- Last update on 2002-03-17
-
- Meshuggah Demo and Effect browser.
- Copyright © 2001, 2002 Carsten Wenzel.
- All rights reserved.