![]()
Hair
![]()
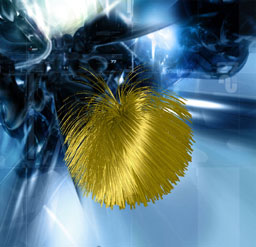
The hair effect shows procedurally generated geometry combined with anisotropic shading. It was inspired by the fur balls seen in lapsus by maturefurk, a demo that took 3rd place at the Assembly 2k demo competition. There are two interesting things about this effect, namely physics and shading.
First of all physics, how to animate the hair under influence of several forces. The two forces used to animate the hair in this effect are gravity and inertia. Gravity is simply a constant vector for all hairs whose direction describes where the hairs should bend to and its magnitude describes how strong they should bend. Inertia is simulated by calculating the 2nd derivative of a function that describes the current position of each hairs end. What information is necessary to describe a hair or a ball of hairs respectively? Well, assuming that each hair starts at the origin and ends at some point on a unit sphere we simply need a unitized normal for the hair direction when there is zero gravity and inertia. To get some variation we should store the hair length as well as a 1D texture coordinate. The 1D texture coordinate will be used in conjunction with a 1D noise texture that gets stretched over the hairs surface to model streaks - the streaks run along the hair - thus giving each hair an individual touch. We use randomized values to setup each hair in order to get a more natural look.
It's time to generate the hairs. Each hair has a fixed number of joints for which a position needs to be calculated. We start at the origin and set the current hair direction to its default. For the rest of the joints we sum up the current direction, the global gravity vector and the hairs inertia vector to a new temporary direction vector. This temporary direction vector needs to be normalized. The position for each hair joint is then calculated by taking the position of the previous joint and adding the normalized temporary direction vector scaled by the hair length to it. The current hair direction is updated by setting it to the normalized temporary direction vector.
vCurPos = ( 0, 0, 0 );
vCurDir = vHairDir;
for 1 to NumJoints do
{
vTempDir = vCurDir + vGravity + vHairInertia;
Normalize( vTempDir );
vCurPos += vTempDir * fHairLength;
vCurDir = vTempDir;
}
We connect all adjacent joints by generating quads between them. In DirectX this can be done efficiently using triangle strips. Note that multiple hairs can be put into one big triangle strip by stitching them together (i.e. generating two degenerated triangles as connection pieces between two individual hairs) to increase rendering performance. In order to generate a quad we actually need two position vectors per joint - otherwise we would be generating lines (that is, triangles with an area of zero!). By crossing the initial direction vector of each hair with the global gravity vector and normalizing the result we get a vector that when shortened by some amount (depending on how thick the hair should be) can be added to each joints position vector to get the second position vector. At this point we should also prepare a 1D texture coordinate for both position vectors so we can form vertices that can be send to the vertex shader later. The 1D texture coordinate for the first position vector is simply the one specified for each hair; the 1D texture coordinate for the second position vector is the sum of the first one and an arbitrary value which is constant for all hairs. The bigger this arbitrary constant value the thinner the streaks.
Now that we have generated the geometry we need to define an appropriate vertex and pixel shader to give the hair the proper look. Normal phong shading would work, though it wouldn't look like hair but plastic. Therefore we use an anisotropic shading model to get the kind of lighting we're after. [1] and [2] describe how this can be done in hardware using a 2D texture as a lookup table for diffuse and specular intensities:
|
for a given point P on a surface |
|
|
L |
vector to light for P |
|
T |
surface tangent for P |
|
V |
vector to viewer for P |
|
N |
surface normal for P |
|
R |
reflected light vector for P |
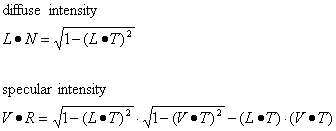
As you can see from those formulas the only two values we need for the texture lookup are L•T and V•T. We pass the tangent vector for each joint of a hair (that is, the current hair direction) along with the position vector and the 1D texture coordinate to the vertex shader. Here we calculate L and V for each vertex and dot them with T to get the proper texture coordinates for a lookup into the texture. Care must be taken to map L•T and V•T from [ -1, 1 ] to [ 0, 1 ] -- via x' = 0.5 • ( 1 + x ) -- since the result of a dot product for two normalized vectors is in [ -1, 1 ] but the corresponding texture space is [ 0, 1 ].
The pixel shader finally does the lighting. It fetches the diffuse and specular intensity from the anisotropy texture map as well as the color for the streaks from the 1D noise texture. The colors and intensities are modulated and combined in the following way:
|
diffuse color = diffuse intensity
• diffuse hair color • streak color specular color = specular intensity • specular hair color • streak color final color = diffuse color + specular color |
Note that the diffuse and specular hair color can be adjusted in the settings dialog in the Effect browser as well as the ambient, diffuse and specular light settings and the gloss factor. Those directly influence the diffuse and specular intensities the pixel shader fetches from the anisotropy lookup texture map.
References
|
[1] Wolfgang Heidrich and Hans Peter Seidel. "Anisotropic Reflections in OpenGL" | |
|
[2] Mark J. Kilgard (NVIDIA). "Hardware Accelerated Anisotropic Lighting" |
![]()
- Last update on 2002-03-17
-
- Meshuggah Demo and Effect browser.
- Copyright © 2001, 2002 Carsten Wenzel.
- All rights reserved.